Calendar
The calendar offers a quick and easy way to set up an automated lighting schedule. Reserve a block of time on the calendar by scheduling a lighting profile for a single event, or schedule a profile that triggers on a recurring basis according to the selected parameters.
LightRules automatically controls the lighting levels in your facility based on a lighting schedule. The default lighting profile configured during system installation populates the calendar.
- When you click and drag a time range on the calendar, LightRules schedules a profile, which is represented by a solid-colored block.
- You can create a block for a single calendar date or specify repeat options so that the block recurs on a specific day of the week, a day of the month, and so on.
- If you stack one profile block on top of another, the most recently created block has priority.
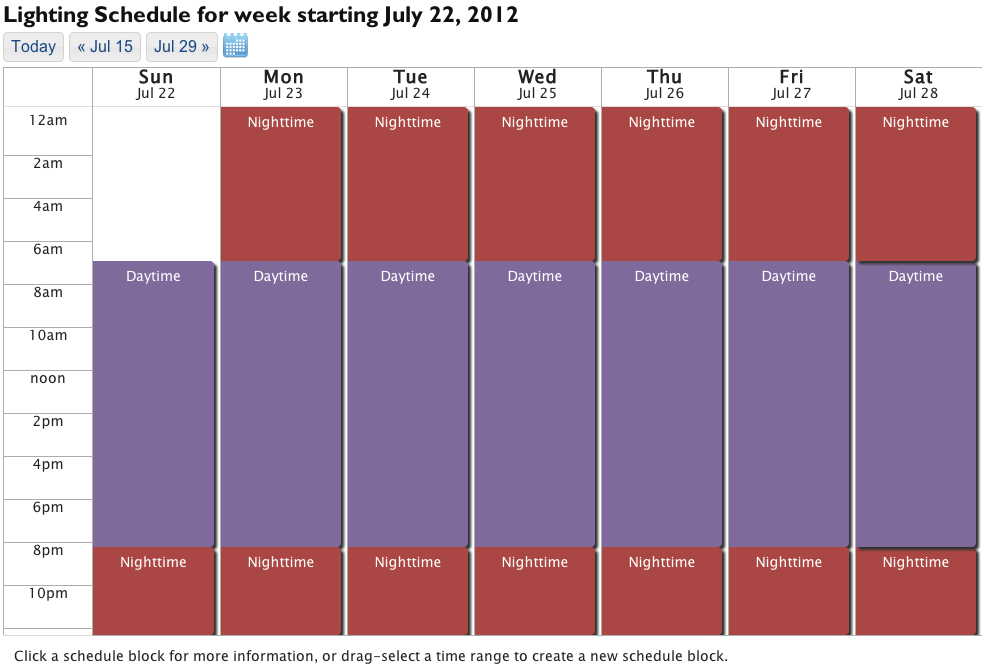
Tip: The white background on the calendar represents your default lighting profile. When you add a block to the calendar, you are effectively overriding the default profile by scheduling a profile for a period of time. The default profile resumes when the block expires.
Calendar Control Tasks
Use the following guidelines when creating your facility's lighting schedule:
- Maximize lighting levels for safety and comfort while the facility is occupied during a typical workday.
- Identify time periods where the facility, or areas of the facility, are unoccupied and schedule accordingly.
- If any areas of the facility require elevated lighting levels on a regular basis, schedule accordingly.
A typical facility will block the following profiles on the calendar:
- Day Schedule: M-F, 6am to 7pm, full occupancy profile.
- Night Schedule: Nightly, 7pm to 6am, reduced occupancy profile.
- Weekend Schedule: Sat + Sun, 6am to 7pm, reduced occupancy profile.
Select Control > Calendar from the menu to open and review the calendar. Each block represents a scheduled profile. Click a block to review its settings and then click Cancel to exit.
The calendar provides standard navigation controls for scrolling to the next/previous week. You can also click on the mini calendar icon and jump to a specific day, month, and year.

Tip: By default, the calendar starts each week on Sunday. You can configure a different day as the start of the week, as needed. Go to for more information.
- Select Control > Calendar from the menu.
- As desired, scroll ahead to a different week in the calendar or jump to a specific day, month, and year.
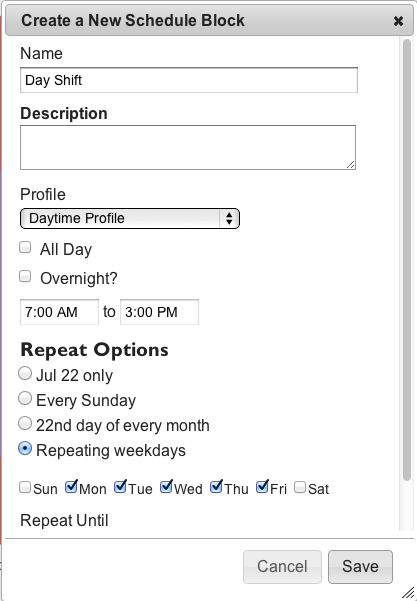
- Click and drag on the calendar to create a new block.
- Type a name for the block and then select a profile from the dropdown list.
- Specify start and end times.
- Select from the Repeat Options:
- [date] Only LightRules triggers the profile according to the start and end times.
- Every [day of the week] Triggers the profile on a recurring basis. Specify an end date, as desired.
- Every [day of the month] Triggers the profile on a recurring basis. Specify an end date, as desired.
- Repeating Weekdays Triggers the profile on a recurring basis, on the checked days of the week.
Specify an end date, as desired.
- Click Save.
Tip: Use the Repeating Weekdays option and check all of the days of the week to repeat a profile every day.
Additional Options
When you schedule a profile, you may also check one of the following:
- All Day to create a block automatically starts at 12:00am and ends at 12:00pm, check the All Day box.
- Overnight to create a block that carries over into the next day, check the Overnight box.
If applicable, to specify an end date, enter a Repeat Until date.
Note: It is preferable not to create blocks that span multiple days. Instead, use the repeat options described above to accomplish the desired result. For example, if you create a separate block for each weekday, you can then edit just that weekday rather than the span of days.
- Select Control > Calendar from the menu.
- Navigate to and click on the block you wish to modify.
- Click edit:
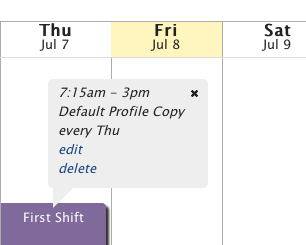
- Enter new settings and then click Save.
- Select Control > Calendar from the menu.
- Navigate to and click on the block you wish to delete.
- Click delete.
- Select a delete option:
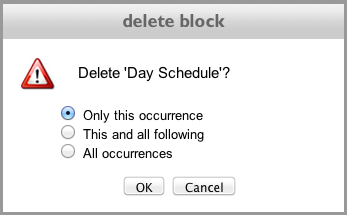
- Click OK.