Profiles
A profile is a list of rules for some or all configured zones. To take effect, the profile must be pushed manually or scheduled as a block in the calendar.
Each light is set up with a default profile during commissioning. To use the LightRules calendar and create a lighting schedule that automates your facility's lighting management, you first have to set up one or more additional profiles.
Note: To create a profile, you first have to create zones. See Zones for more information.
Think about occupancy on weekdays versus weekends and also occupancy by shift. Design profiles accordingly.
For example, create profiles with the night lights inactive power level turned down. Similarly, you can adjust occupancy sensor delays to match the lower occupancy.
Guidelines for Designing and Editing Profiles
- Create and schedule profiles for weekdays versus weekends.
- Create and schedule profiles according to the time of day / shift.
- Create and schedule holiday profiles.
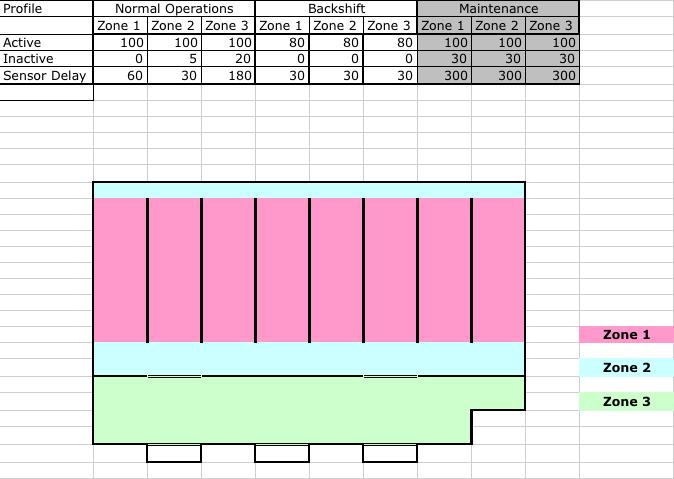
Normal Operations Profile
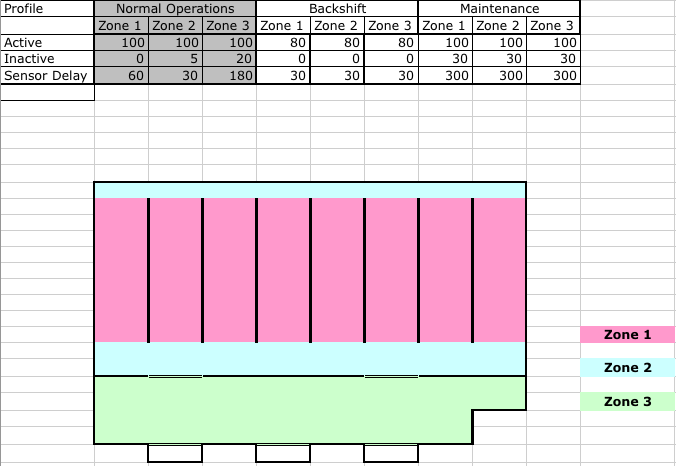
Backshift Profile

Maintenance Profile
- Select Config > Profiles from the menu.
- Click New Profile.
- Type a name for the profile.
- Select a zone.
- Modify the rule set for the selected zone:
- Use the right slider to adjust the active power level (20 -100).
- Use the left slider to adjust the inactive power level (0 - 100).
- Enter the desired sensor delay (minimum 30 seconds).
- Click Add Rule and then repeat step 5 for all desired zones.
- Click Save.
Note: The active power level has a minimum level of 20, for safety purposes.
- Select Config > Profiles from the menu.
- Within the row of the profile you wish to modify, click Edit or Clone.
- Modify the rules for each zone, as desired.
- Click Save.
- Select Config > Profiles from the menu.
- Within the row of the profile you wish to modify, click Delete.
- Click OK to confirm deletion.
Note: You cannot delete a profile that is in use or scheduled in the calendar.